Capistrano
Deployment using Capistrano🤔
Published on May 31, 2021 by Suraj Kumar
rails ruby Capistrano secforge
6 min READ
What is capistrano
A deployment automation tool built on Ruby, Rake, and SSH. Automation of the deployment can be done through capistrano Basically we need 5 Important keys in the deployment
- Predectable
- Repeatable
- Automatable
- Reversable
- Extensable
With capistrano we can implement all the 4 necessary key points. Capistrano was created in ruby so mostly the developers use this tool for ruby deployments but it can be used to deploy other applications also.
Prerequisites
- Local machine
- Web server
Setting up the Project for capistrano tasks
Installing ruby rails on ubuntu
# Add the rvm key to the server.
gpg --keyserver hkp://keys.gnupg.net --recv-keys 409B6B1796C275462A1703113804BB82D39DC0E3 \
7D2BAF1CF37B13E2069D6956105BD0E739499BDB
# Install the rvm stable version by running the command below.
curl -sSL https://get.rvm.io | bash -s stable --ruby
# Source
source /usr/local/rvm/scripts/rvm
# check the version
rvm version

# Setup Ruby Latest Version
rvm get stable --autolibs=enable
usermod -a -G rvm root
# available ruby versions.
rvm list known
Now we have to create a sample project for the deployment of the capistrano
# It will automatically create the needed files and setup the boiler plate code for us

rails new </ProjectName>

# Edit the gemfile and add capistrano

vim Gemfile # Add gem 'capistrano'

# Using the bundle command to install all the necessary gems
bundle

# In capistrano 2.X capify . was used but now
cap install

# And its capified
Now it had done some default changes and created all the files required.
Capistrano is all about task
How we can configure our manual tasks to be configued and run by the capistrano are by changing the values in the config/deploy.rb
# Open the deploy.rb file and configure the tasks to be executed by the capistrano
git clone https://github.com/Imsurajkr/store.git
cd store
vim config/deploy.rb
# add the following changes to the deploy.rb file to add mannual commands

# Here I am setting up a variable with term recipient

set :recipient, "Ruby"
# Adding a description is always nice
desc "This is a hello world task"
# Created a task hello
task :hello do
# Puts command is used for printing out in the terminal
    puts "hello #{fetch(:recipient)}"
    # Roles I will discuss below
    on roles(:web) do
    # Execution of the commands
        execute 'whoami'
    # Ending the tag
    end
end

# Another task
task :goodBye do
    puts "Goodbye  #{fetch(:recipient)}"
end

# We can add a sequence to our tasks
after :hello, :goodBye
#
Roles in capistrano
Roles allows us to write capistrano tasks that apply to Multi-sever deployments The default roles of app web db are also used internally so their presence is not optional the :Primary=”true” is an attribute that allows for further granularity in specifying services in custom tasks
capistrano is designed to run commands remotely
As discussed it have predefined tasks which are
- Web :- web is for nginx
- app :- Application hosted on a server
- db :- database setup . i.e postgres, sql
We can also checkout the recipies described by the capistrano on this link.
Running Commands on the remote .
Capistrano is basically popular for running and setting up the releases on the remote server .
Now let’s setup the remote server :-
Run on local
ssh root@1.2.3.4
Run on remote
sudo su # To switch into remote machine

adduser deploy
adduser deploy sudo
exit
Copy Id on Local machine
ssh-copy-id deploy@1.2.3.4 # in 1.2.3.4 replace with your IP

# we are copying the keys on local so that it will not prompt for password with capistrano
Installing Ruby on the remote system
# for capistrano ruby must be installed on the remote system

# Adding Node.js repository
curl -sL https://deb.nodesource.com/setup_12.x | sudo -E bash -
# Adding Yarn repository
curl -sS https://dl.yarnpkg.com/debian/pubkey.gpg | sudo apt-key add -
echo "deb https://dl.yarnpkg.com/debian/ stable main" | sudo tee /etc/apt/sources.list.d/yarn.list
sudo add-apt-repository ppa:chris-lea/redis-server
# Refresh our packages list with the new repositories
sudo apt-get update
# Install our dependencies for compiiling Ruby along with Node.js and Yarn
sudo apt-get install git-core curl zlib1g-dev build-essential libssl-dev libreadline-dev libyaml-dev libsqlite3-dev sqlite3 libxml2-dev libxslt1-dev libcurl4-openssl-dev software-properties-common libffi-dev dirmngr gnupg apt-transport-https ca-certificates redis-server redis-tools nodejs yarn
# Setting up rbenv
git clone https://github.com/rbenv/rbenv.git ~/.rbenv
echo 'export PATH="$HOME/.rbenv/bin:$PATH"' >> ~/.bashrc
echo 'eval "$(rbenv init -)"' >> ~/.bashrc
git clone https://github.com/rbenv/ruby-build.git ~/.rbenv/plugins/ruby-build
echo 'export PATH="$HOME/.rbenv/plugins/ruby-build/bin:$PATH"' >> ~/.bashrc
git clone https://github.com/rbenv/rbenv-vars.git ~/.rbenv/plugins/rbenv-vars
exec $SHELL
rbenv install 3.0.1
rbenv global 3.0.1
ruby -v
# ruby 3.0.1
# This installs the latest Bundler, currently 2.x.
gem install bundler
# For older apps that require Bundler 1.x, you can install it as well.
gem install bundler -v 1.17.3
# Test and make sure bundler is installed correctly, you should see a version number.
bundle -v
# Bundler version 2.0
We have to configure the database and the Web also but before that lets test our capistrano
We have to tell capistrano to run on the remote machines for that we can configure
vim config/deploy/staging.rb
# add this line in your config to let the capistrano know your server
server "<YourIp>", user: "deploy", roles: %w{app db web}
Setting up the deploy.rb
vim config/deploy.rb
# Add the following lines to setup the git repository and branches
set :repo_url, "https://github.com/Imsurajkr/store.git"

set :branch, "Feature/something"

set :deploy_to, "/home/deploy/store"
Its Time to test out our capistrano
# on local machine we can check out the tasks
cap -T
# we can execute the commands with
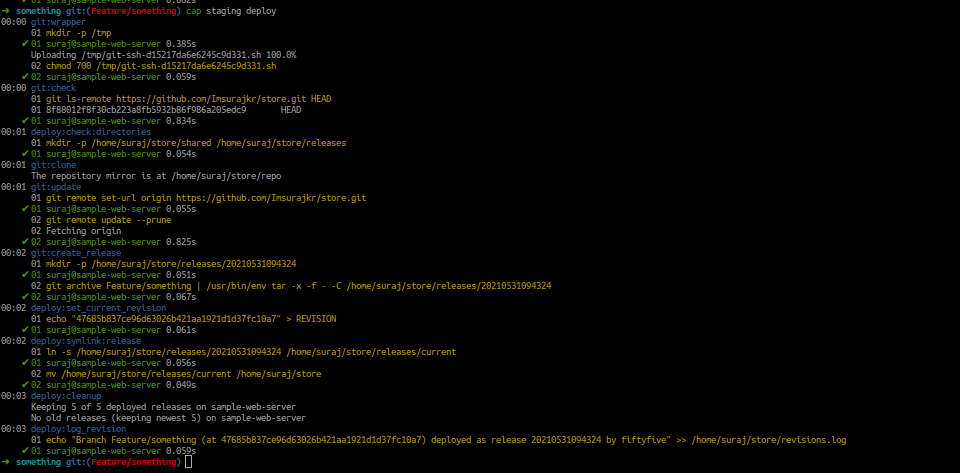
cap staging deploy --trace

The Directory Structure
- Current -> Points one of the directory in the releases
- Releases -> Every deploy we have done have directory with the timestamps that actually took place on server
- Repo -> Cached version of our git repository
- shared -> Anything that is being shared between deploys
- Revision.log -> contains the history of all your deployments
